Sunday, December 23, 2012

Stockings!

It's Christmas Eve!  I finally got our stockings done and hung!  Right in time for Santa.  I love how they turned out!  I made them out of sweaters; the green one was part of my wardrobe,  until a few years ago,  and I have been saving it for this idea since then! I picked up the red and cream sweaters at a thrift store.  Hobby Lobby has the fabulous Chevron fabric.  For six stockings, it cost me less than $20!  I had to enlist the help of my very talented mom for this project.  We spent an entire Saturday sewing stockings.  I managed to snap a few photos with my phone as we went so I can show you how we made them.   I completely forgot to take a picture of the sweaters before!  I was so excited to get cutting. Before pictures are so fun too.  Sorry  : )  
First we drew and cut a stocking pattern out of tracing paper:  
Then I cut all my front and back pieces.  I was going to use the sweaters for both the front and the back, but after sewing one, I learned it was going to be too hard.  The sweater fabric is too thick and stretchy, so the finished stocking didn't hold its shape well.  Plus, I would probably need to sew liners in to help it not stretch and loose its shape after Santa fills it with goodies.  More work.  So I un stitched the sweater front and back stocking and went to plan B.  Fabric back, sweater front.  IMPORTANT:  As you cut the pieces make sure all the stockings will hang the same direction!  Unless of course it wouldn't bother you to have them hanging different directions. : )
I wanted the chevron fabric to fold over,  so we had to figure out how to sew it on and have it face the right direction.  The hardest part about these stockings is all the right side/wrong side sewing.  I hope this little tutorial will help!
Cut the stocking pieces.  (Remember to pay attention to which direction they will hang!  We messed up on one and had to re-do it.)

 Sew a piece (same sizes) of the chevron fabric to the top.  This will be the fold over.  Lay the stocking pieces right side down.  The 'fold over' piece will go right side to wrong side.  Sew along the top.
 It should look like this after it is sewn and flipped up.  (Sorry this pic is blurry)
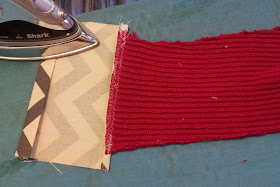
 Then iron it so the 'fold over' piece is up.  Also fold over and iron the raw edge.   
Next, put your two stocking pieces right sides together and pin.  The 'fold over' pieces at the top should be wrong sides together or right sides out as shown here.  (Confusing I know!)
 Now sew around the stocking. Do not sew the 'fold over' pieces yet!  
Turn the stocking inside out and think "Hey, it looks like a stocking!  Cute!"
 At this point all the right side/wrong side starts to make sense.  See how the 'fold over' pieces will fold over and show the right side?  Pin the edges.
 Sew along the two edges.
Now fold over the 'fold over' pieces.  And Ta-Da!  It's a stocking!
 I did four with the chevron folded over and 2 with the sweater folded over.  For the two with the sweater folded over, I added some lace and poofy ball trim.  And I totally hot glued it on!  First I hot glued the trim to the lace, then I hot glued the lace to the stocking!  It looked way to hard to sew on and I was all sewed out : )  I think the hot glue will work just fine!
   Last, I sewed some ribbon loops for hanging. 
 (You can check out my stocking holder here.)

 This is what the backs look like:


I could not have figured all this out and got them done without my mom, she really made it happen. : )  She's a genius!  Now deciding who's is who's has been a hot topic around here!  I love them all. I'll probably add initials to each one somehow, but not by tomorrow.  We'll do something more temporary this year. Can't wait for Santa to put some treats in them! 
 I hope you have a very Merry Christmas!!!
We're hoping for snow!!

Thursday, December 20, 2012

Hearts for Newtown

I just wanted to share this if you haven't seen it yet.  I think this is a great idea!  Most of us don't know anyone in Newtown, but our hearts are aching for them none the less.  I have shed many tears for those families as I know we all have.  This is a simple way to feel like maybe we can help, even just a little.  I think it's also a great way to help our kids see that compassion and love, even toward strangers, can help lift them up.  I will be doing this with my girls, I hope Newtown gets plastered with hearts so they can know we all care!
Hearts to Newtown 


Christmas crunch and pretzel kisses

This is definitely a recipe worth sharing!  I got it from my sister in law a few years ago and have made it multiple times around Christmas since then.  It's actually great anytime, but somehow has just become a Christmas time treat for us.  It is AMAZING! 
What you need to make it and love it too:
CHRISTMAS CRUNCH
3 cubes butter
  1 C. corn syrup
1 C. sugar
Boil 2 minutes, let stand 5-7 minutes
2 C. Corn Chex
2 C. Rice Chex
                2 1/2 C. Honey nut Chex
                5 1/2 C. Golden Grahams
             1 pkg. slivered almonds
                         1 1/2 C. coconut (or as desired)
Mix cereals, almonds, and coconut in very large bowl.
Pour the butter, sugar syrup over the cereal mixture and mix well.
 This makes a lot!  It's great for taking to parties or giving as gifts.  I can only make it if 
we take or give it because otherwise we will eat it all!  Which can't be good.....: ) 
I packaged it up and gave it to neighbors.  Yum!!

One of our other favorite Christmas time treats are these pretzel kisses.  Have you seen or made these?  I love them!  I love the salt and sweet combo of pretzels and chocolate.  These are easy and fun for kids to help with.  Kids are actually a great help with all the unwrapping involved.


PRETZEL KISSES
Pretzels (I like these square ones best)
                                         Hershey's Kisses (any kind, I do milk chocolate and candy cane)
plain M&M's
Heat the oven to 170-190 degrees.  I have to heat mine to 190, it's old and electric.
Fill a cookie sheet with pretzels and top each with a Kiss.  My 4 year old loved helping with this!
Put in the oven for about 6 minutes to soften the chocolate.  The candy cane Kisses melt faster than the chocolate.  I'd probably do them on a separate cookie sheet next time : )
Once the chocolate is melty, press an M&M onto the top.  (You can see the candy cane ones are more melted.)  Then refrigerate for 10 minutes or so to harden.  Cute and yummy!


Monday, December 17, 2012

CHRISTmas ornaments and easy glitter ornaments

I bought these ornaments on sale at Michaels last year but didn't come up with anything I wanted to do with them until this year.  They are plastic!  No glass ornaments around here : )  I have seen lots of cute ways to use these on Pinterest.  Let me show you the two ways I came up with!

ORNAMENT #1
 In an effort to remember the reason for the season, I decided to shrink a picture of 
Christ and place one in the ornament to hang on our tree.  
 Then I made a few to give as gifts for my Activity Day girls.  
 First I put a little Kosher salt in each ornament, it looks like snow!
Then I put a piece of white tulle in to hold the picture in the floating position.
Last I rolled my little pictures (roll so the front side of the picture faces out,)  and used 
tweezers to get the picture in the ornament with the tulle behind it.  
Tweezers are a must to place the picture just right!
I tied another piece of white tulle to the top added a tree hook and that was it!  
I really like how they turned out!

ORNAMENT #2
These next ones came about from my daughter wanting to make a gift for her grandma's.   We needed it to be pretty easy, preferably with stuff on hand, and of course cute.  We decided to try glue dots and glitter.  Why not?   I'm sure it's been done, but we thought we were pretty clever!  
 They worked perfectly!  I stuck some glue dots on, she poured and pressed glitter onto each dot and that's it!  She loved it and they turned out really cute!
For some other fun ideas check out this post from Ginger Snap Crafts!

Thanks for stopping by! : )

Linking up at these great parties!  Not Just a Housewife , Ginger Snap Crafts, Someday Crafts


Thursday, December 13, 2012

DIY Santa bags


        I made these bags to leave out on Christmas Eve for Santa to put our girls presents in.  This saves loads of time and wrapping paper and time spent using wrapping paper!  They are the simplest sewing  project ever!  I used fleece, so there is no hemming, or fraying. 
 Plus it's inexpensive and soft!  
 I made them pretty big, 3ft. by about 2 1/2 ft.  I stuffed these with blankets for the picture.  The green one has 3 blankets in it!  The red one has 1 blanket, 2 Snuggies, and 2 throw pillows!  Big, yes!  They will hold big presents or multiple presents.   To make them I simply sewed 2 pieces of fleece together along 3 sides.  Then turned them right side out.  To make it even simpler I just had the fabric store cut the fleece in 1 yard increments (3 feet!)  
I made one for each girl and stitched their initial on their bag.  Nothing fancy here, I hand drew the letter straight onto some white felt, cut it out and hand stitched it on with embroidery floss
Definitely not perfect, but still cute : )
My girls are so excited to leave these out Christmas Eve!  I feel like wrapped gifts are so magical and exciting under the tree, but there is something magical about an empty bag at night and a full bag in the morning too!  
I hope you're feeling ready for Christmas!  I am not yet!  As far as shopping goes anyway; the magic and fun and family of Christmas is here of course: )  My cute 4 year old said "Christmas is about love huh mom."  "YES!"  I said proudly.  Then she said, "well, love and PRESENTS!"  I still said yes, we like to give presents to show our love.  Kids are cute : )

Linking up at these great parties! Ginger Snap Crafts,    Someday Crafts Not Just a Housewife

Monday, December 10, 2012

Quick and easy "JOY" banner

I'm convinced a banner makes any decorated space look 10 times better.  To me, it makes it look like all that stuff was put there on purpose.  I created this backdrop using a big roll of patterned butcher paper from Hobby Lobby.  I just taped it onto a big piece of cardboard.  I used it as a backdrop for some pictures and actually stuck up on the piano to keep it away from the kids.  But..... then I kind of liked it there.  I had it up for my Halloween ghosts, with a banner of course, check that out here.  Needless to say, my faux wood backdrop is still there, but with a Christmas banner.
 This was so easy to make!  It is burlap triangles, paper lace doilies from the
 Dollar Store cut in half, string, and scraps of lace.
Once the burlap and doilies are cut, layer the doily under the burlap triangle, 
then find the biggest needle you can and sew it all together.

My JOY letters are from a pack of address stickers from Lowes.  EASY!
I grabbed some scrap lace and tied strips in between each piece, and some 
around the candle.  I also added a couple burlap flowers.


This is our only Nativity and I love it!  It was a gift from my husbands grandparents the first Christmas we were married.  It is detailed and beautiful and my kids know they are not allowed to touch it.   There is actually a piece of burlap in the stable at the back and with the rustic woodsy look of the Nativity, it was just meant to be coupled with wood and burlap (and lace?!)

Merry Christmas!

Linking up at these parties:  Gingersnap Crafts, Someday Crafts, Not Just a Housewife

Friday, December 7, 2012

No Mantle Stocking Solution

We don't have a mantle, but of course still want to hang stockings.  So I got some wood, paint, and hooks and created this stocking hanger for our family of 6.
 I  added the fun quote with vinyl (my mom has a Cricut)  and some snowflakes.
 I just bought a pack of hooks at the hardware store and screwed them to the board.
It is attached to the wall with some Command velcro strips so there will not be permanent holes in the wall after the stockings come down.   There are currently no stockings hanging on it for good reason!  I've been wanting to make some new stockings for years, and this is finally the year!  Can't wait to finish them and show you! 

Linking up at these parties:  Gingersnap Crafts, Someday Crafts, Not Just a Housewife